Webhooks
Webhooks are a very simple, yet very powerful way to integrate with external systems such as email or any other system via an HTTP post request. The webhook, a simple application designed to handle incoming HTTP requests, will parse and process a payload from Scalr and then integrate with the external systems when events occur during a Terraform run, such as:
- Run complete - When the run is completed successfully
- Run errored - When the run is prevented from continuing due to an error in the code, cancellation, or a policy failure.
- Run needs attention - When someone will need to review a plan based on the workspace not having auto-approval or if a policy override is required.
During any of these events, Scalr will send a payload to an endpoint that the administrator has defined.
Webhook Configuration
Webhooks can be created through the Scalr UI, API, or provider at the account scope under the integrations section and then assigned to environments.
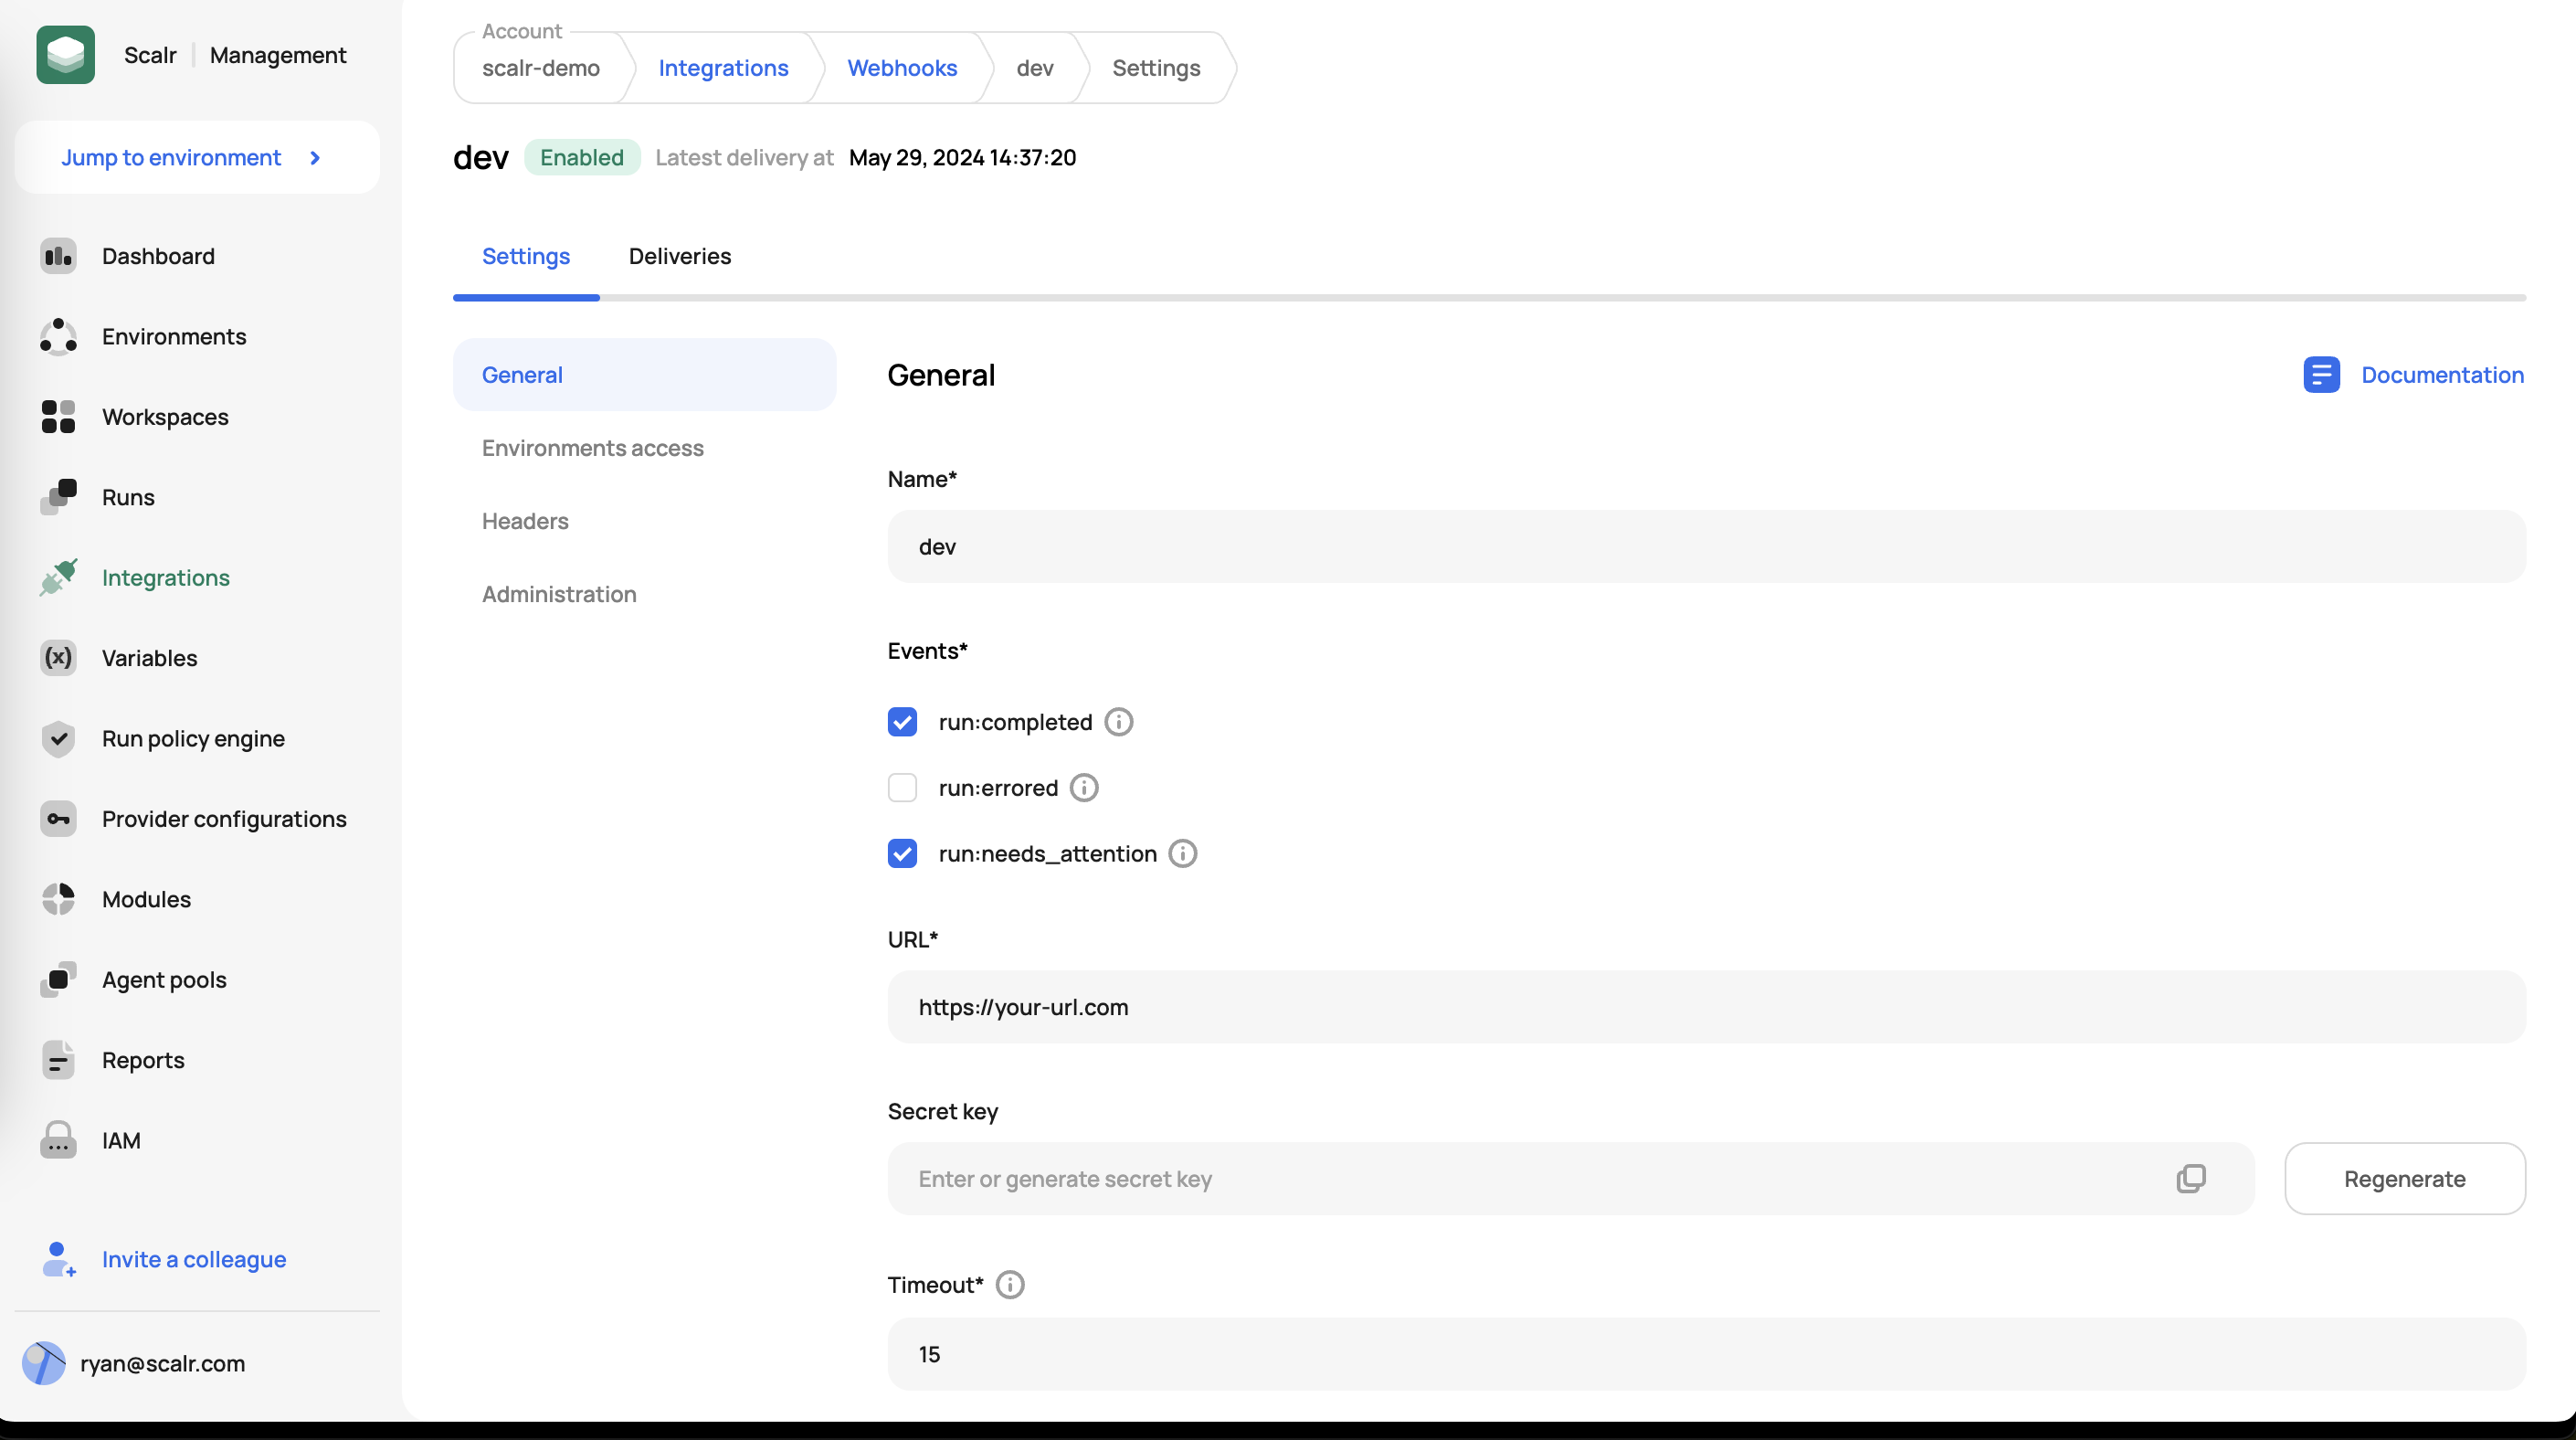
When creating a webhook, you must specify the events that will trigger it, the URL of the API you are calling, as well as the key that will be passed for authentication.
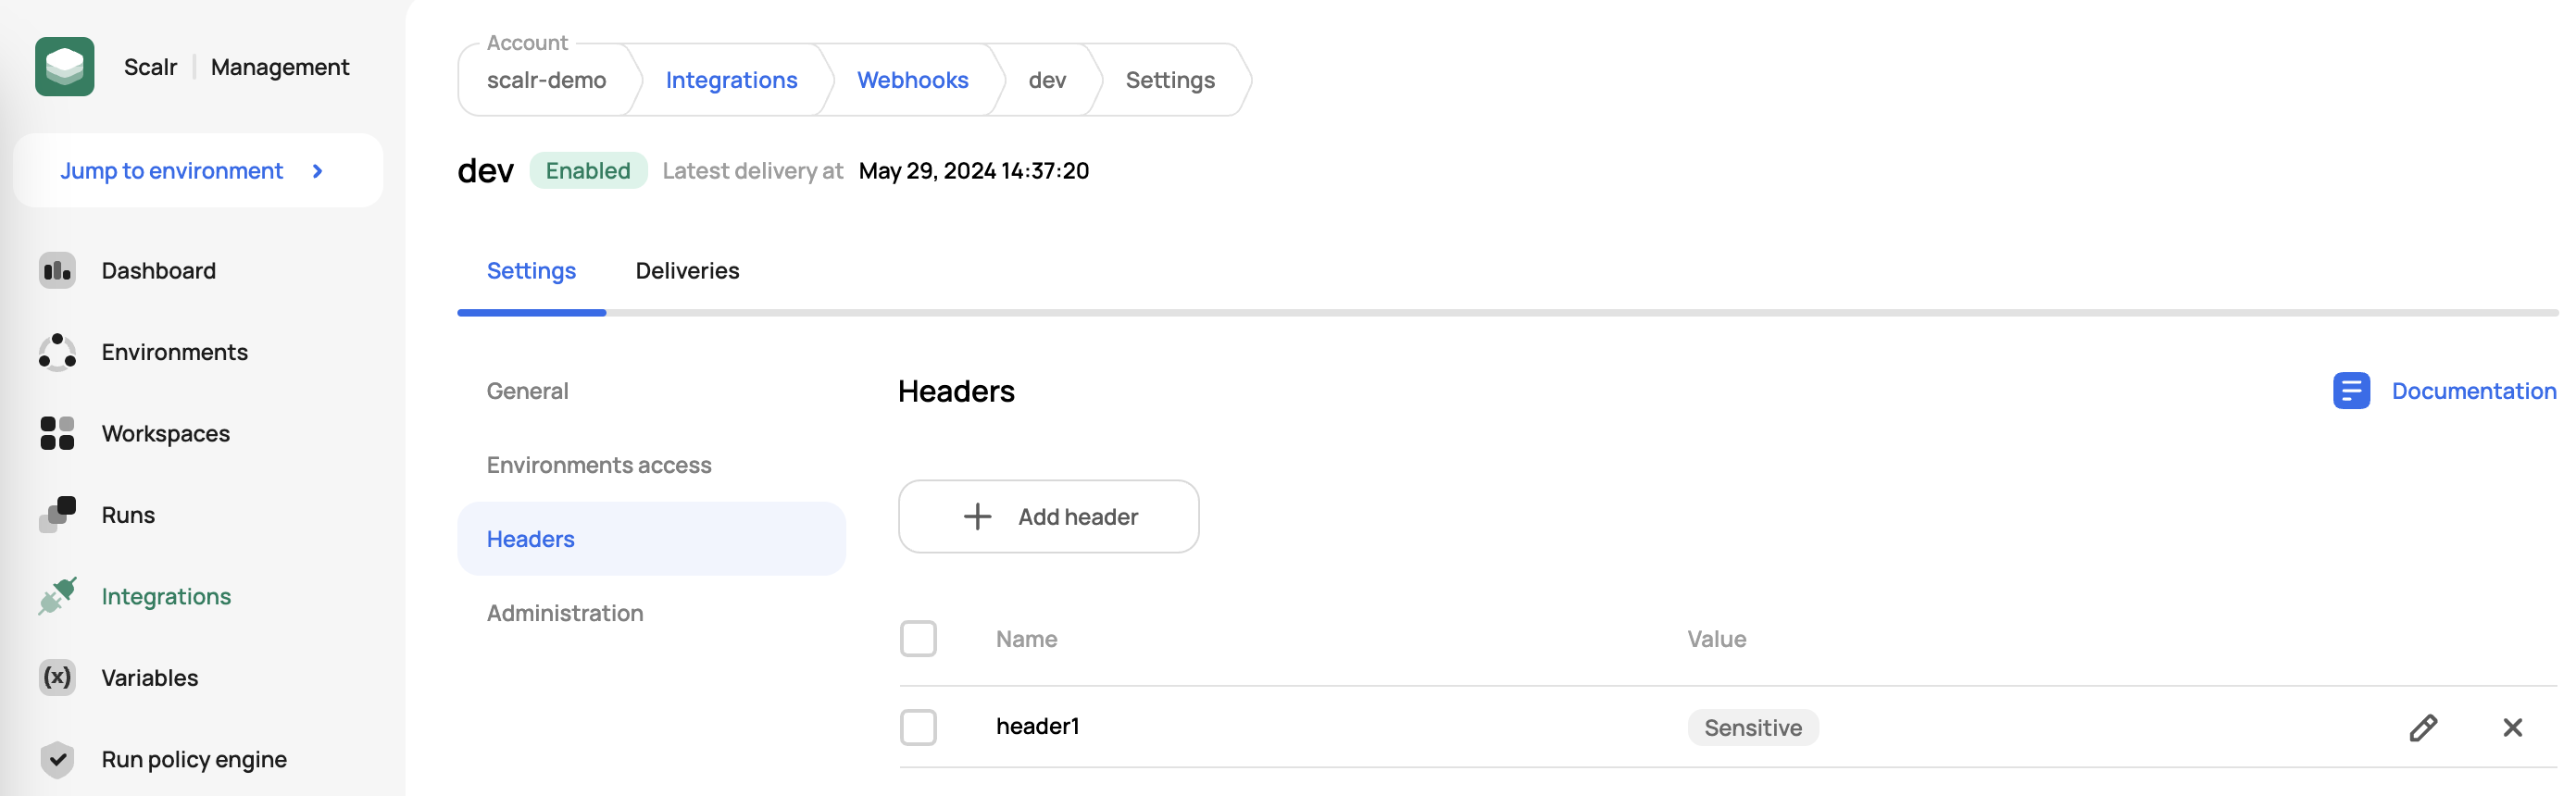
Once a webhook is created, you can add your own headers in the headers tab of the webhook:
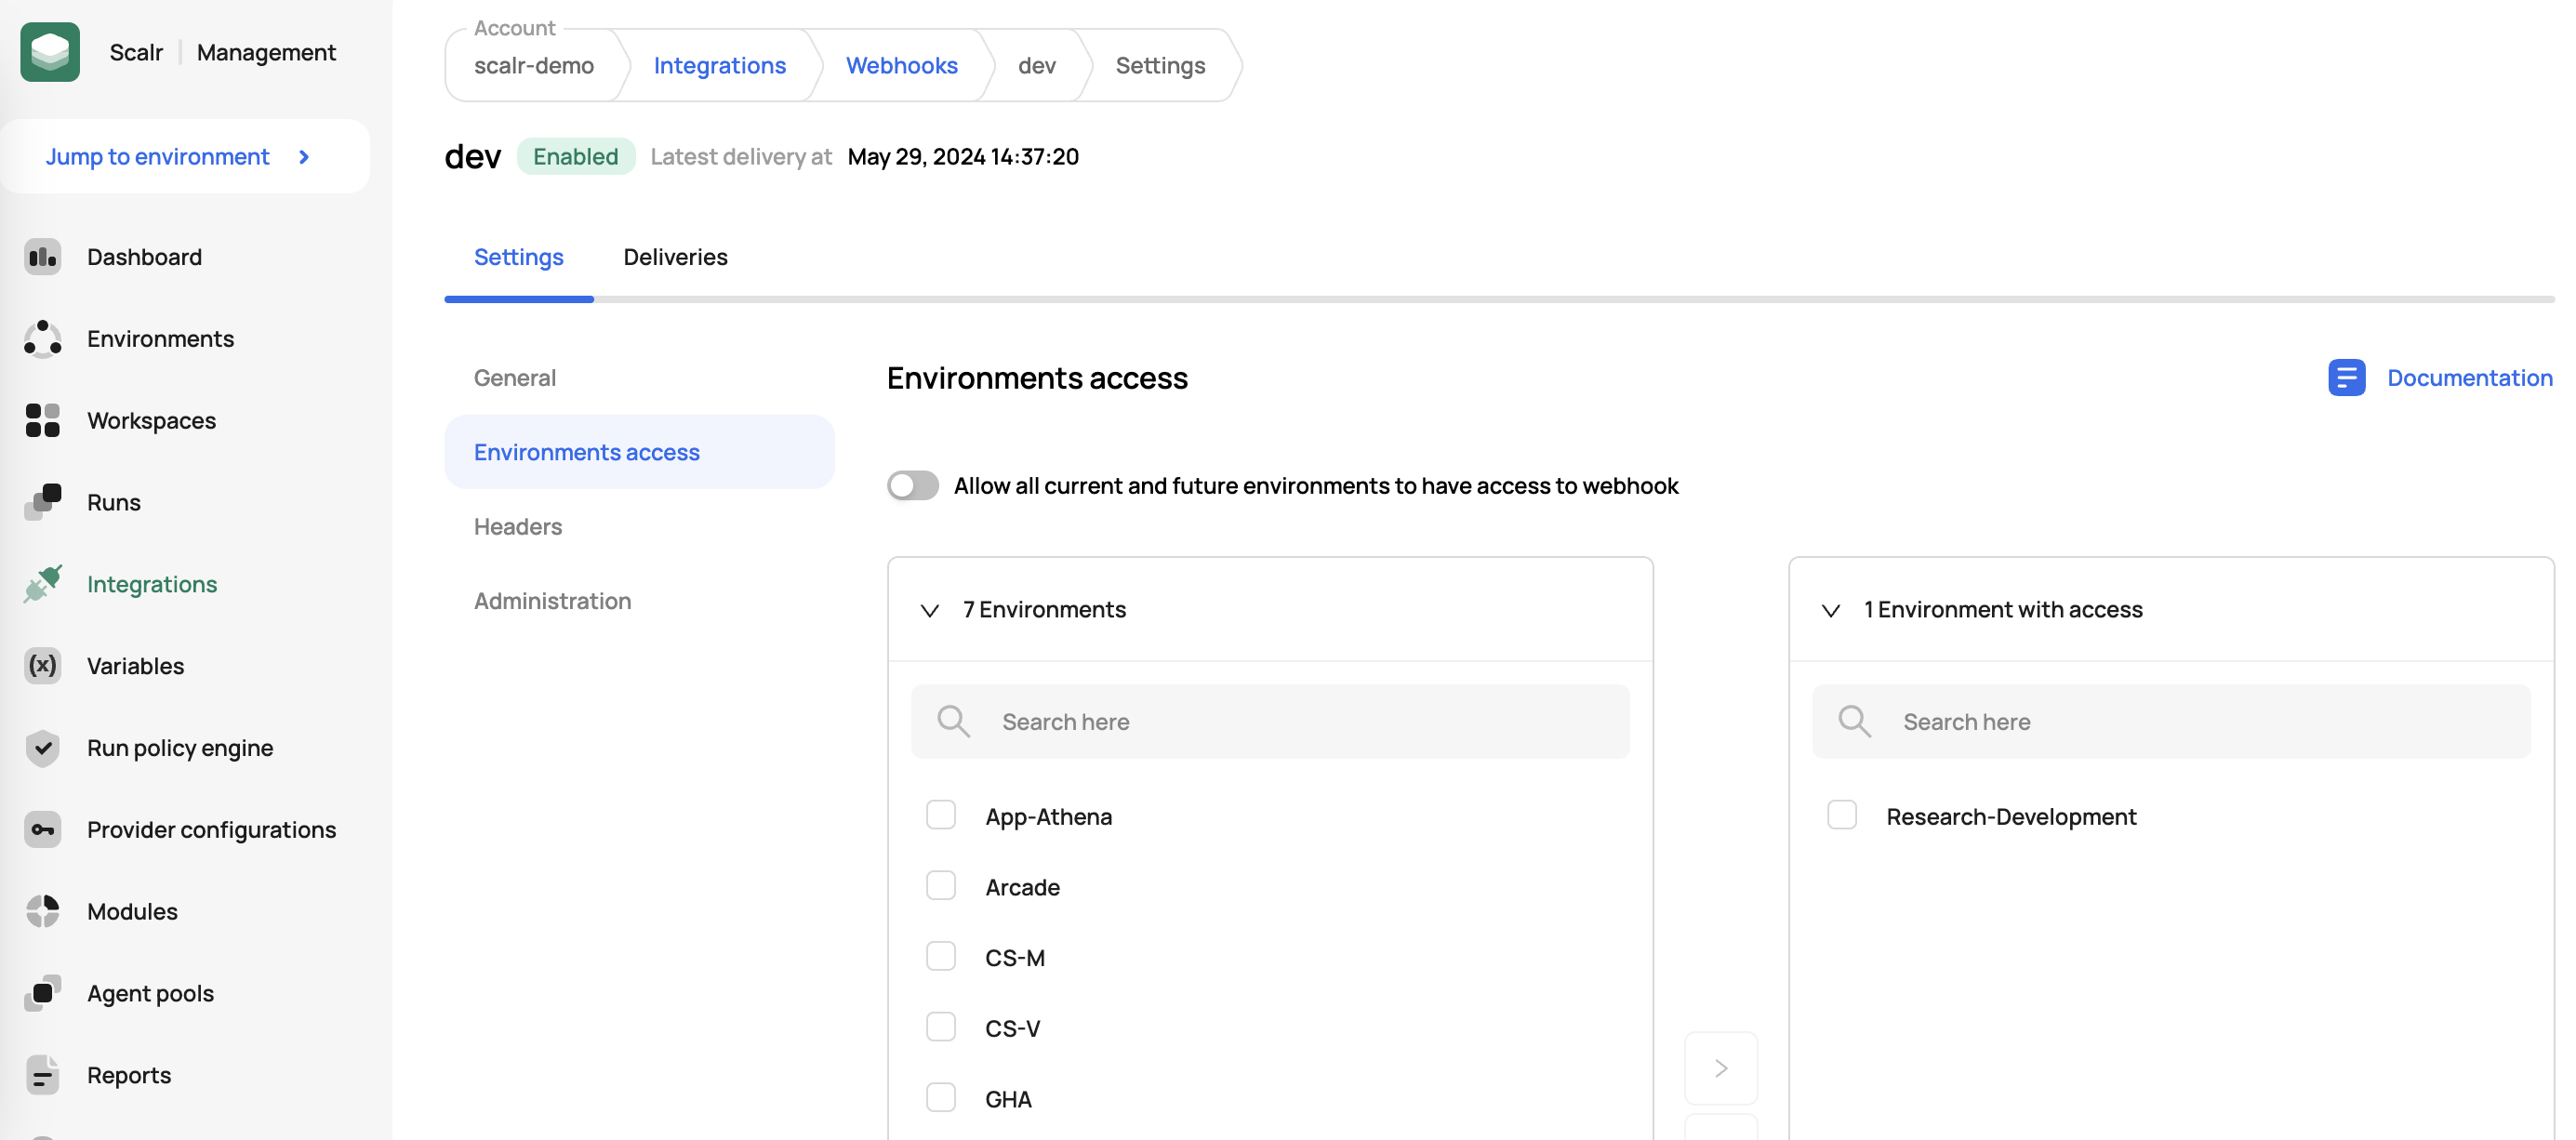
Environment Assignment
Webhooks can be assigned to environments and once assigned, any workspace in the environment will then trigger a webhook when the specified run event occurs:
Deliveries
To see the status of the webhook and the deliveries made, click on the deliveries tab:
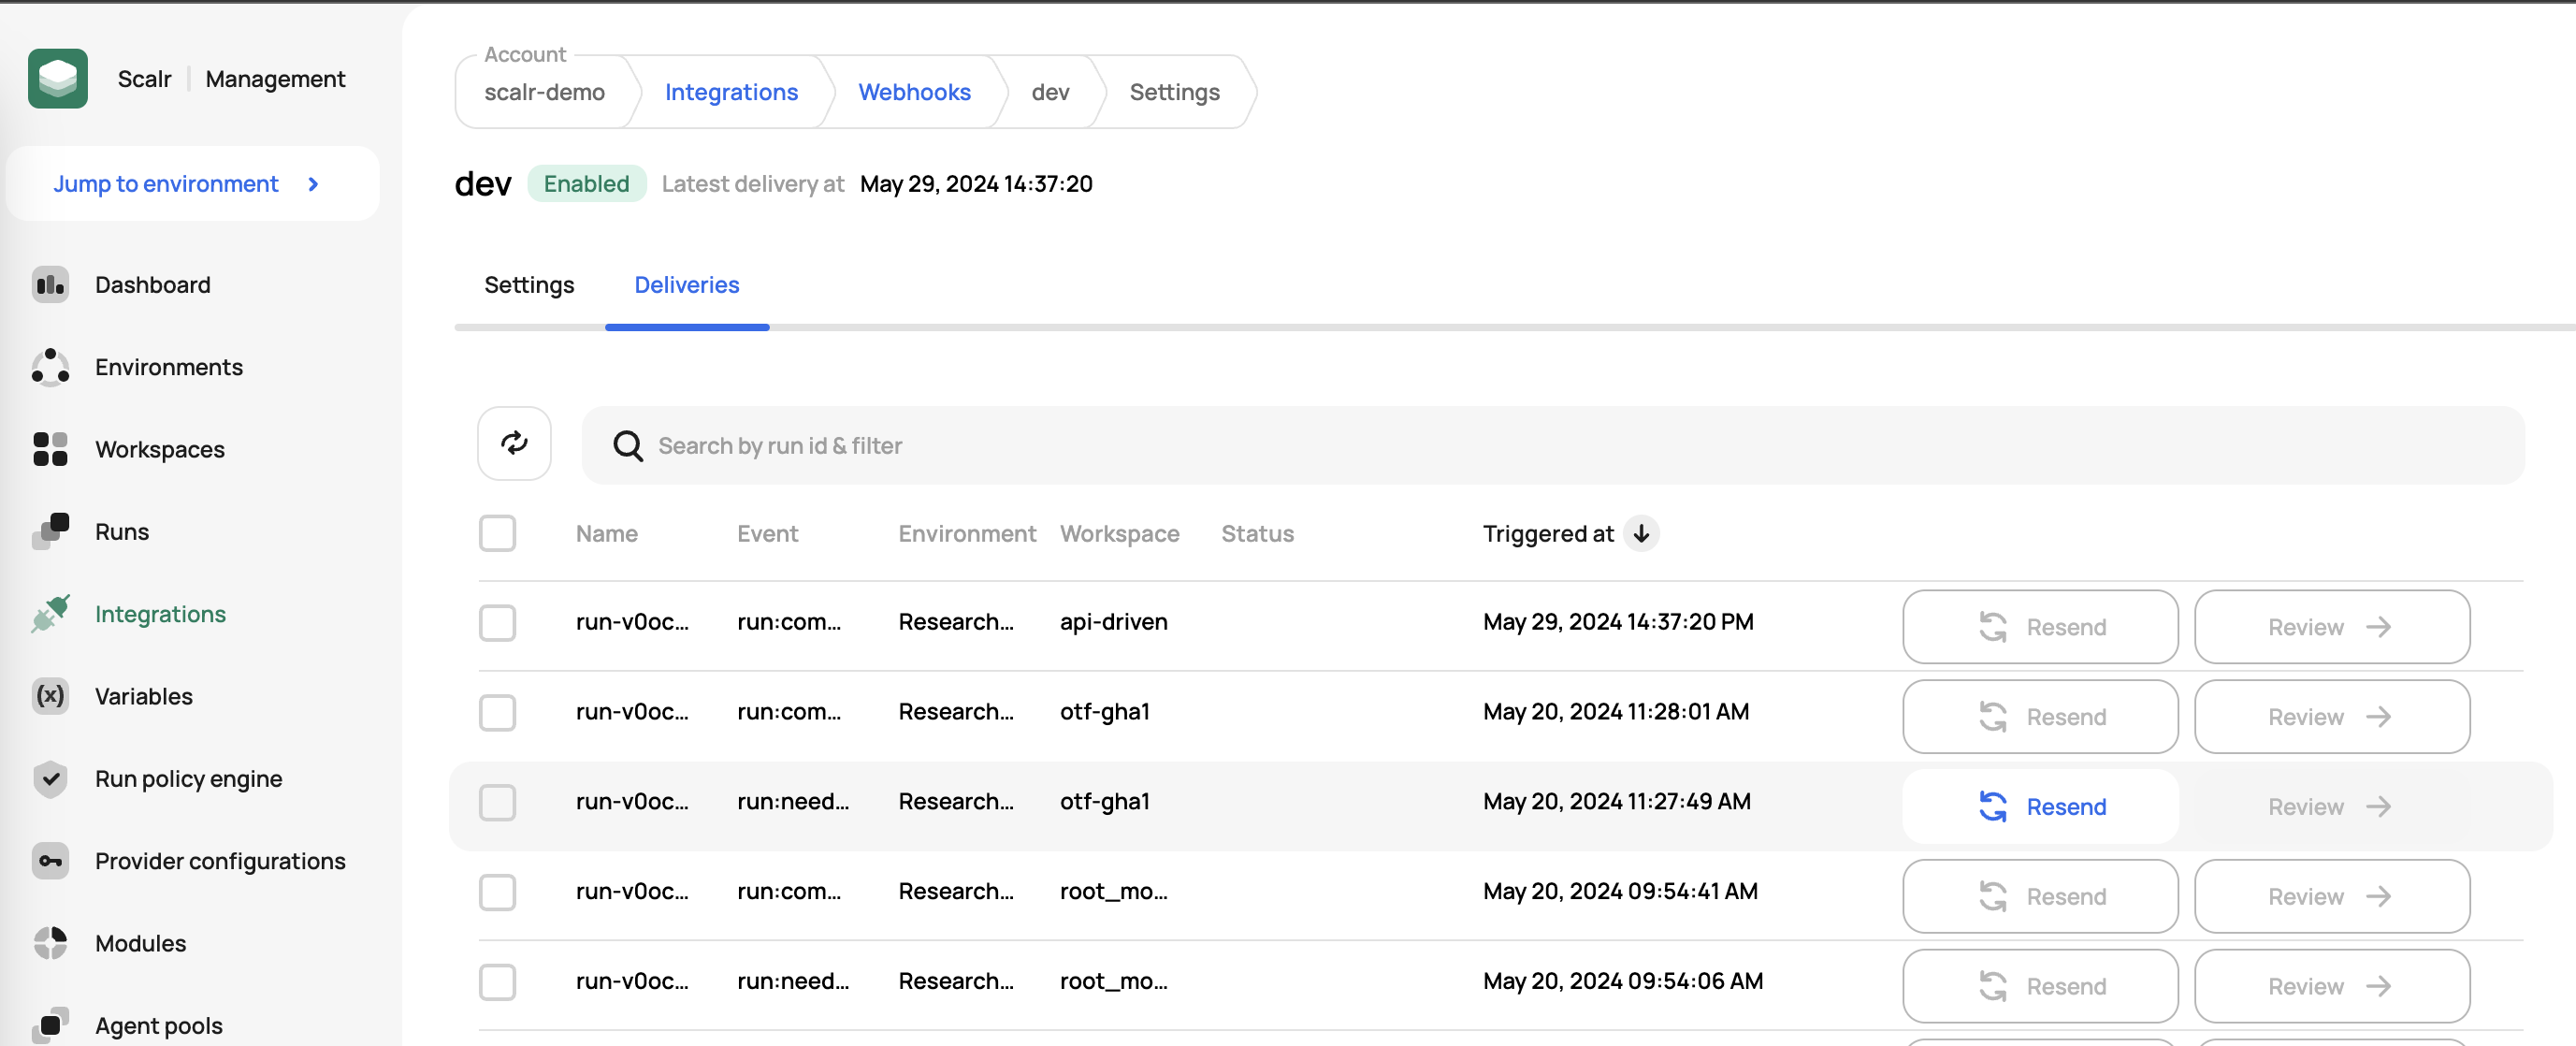
From here, you can resent the event if needed or review the details of an event that has already been sent.
Example Payload
The following is an example of a payload that would be sent from Scalr:
{
  "environment": {
    "id": "env-u0b83rvjmsjk123",
    "name": "Research-Development",
    "url": "https://example.scalr.io/v2/e/env-u0b83rvjmsjk123/"
  },
  "event-name": "run:completed",
  "payload-version": 1,
  "run": {
    "created-at": "2024-07-03T16:25:44",
    "created-by": {
      "email": "[email protected]",
      "id": "user-stp8qjepev3a123",
      "username": "[email protected]"
    },
    "id": "run-v0oe5ki1pnaptv123",
    "message": "",
    "source": "dashboard-workspace",
    "status": "applied",
    "updated-at": "2024-07-03T16:28:07",
    "url": "https://example.scalr.io/v2/e/env-u0b83rvjmsjk123/workspaces/ws-v0oapbepcjdj9d123/runs/run-v0oe5ki1pnaptv123/"
  },
  "variables": {
    "some_variable": "some_value"
  },
  "webhook": {
    "id": "wh-v0o8vscu2ccgva123",
    "name": "dev"
  },
  "workspace": {
    "id": "ws-v0oapbepcjdj9d123",
    "name": "blue_green",
    "url": "https://example.scalr.io/v2/e/env-u0b83rvjmsjk123/workspaces/ws-v0oapbepcjdj9d123/"
  }
}
Example Webhook Server Code
WarningThis code is provided as an example only and assumes the reader has the necessary Python skills to properly implement a webhook server. This should NOT be used in production systems without full testing and validation and this code IS NOT supported by Scalr. Other languages can be used.
For those of you who want to build and maintain a webhook server, the following provides an example of doing so with Python. Instructions for installing on Centos are embedded in the code. For other operating systems please use the appropriate commands to install the packages and utilities.
This code defaults to listening on port 5018. You can change this on the last line.
NoteCode to make onward calls to other systems must be added at line 80 where a simple example is in the comments. In general, some authentication will be needed, e.g. a bearer token.
#!/usr/bin/env python3

# Disclaimer: Please don't use the following code in the production.

# # install instructions for centos:7
#
# yum update -y
# yum install -y python3
# pip3 install flask python-dateutil pytz
# vim server.py
# # put content of this file in server.py
#
# export SCALR_SIGNING_KEY=your-secret-here
#
# # run a server
# python3 server.py
#
# #use your webhook endpoint as: http://x.x.x.x:5018/webhook-endpoint/

from flask import Flask
from flask import request
from flask import abort
from flask import jsonify

import hmac
import hashlib
import logging
import os
from datetime import datetime
import dateutil.parser
import pytz

# Configuration variables
SCALR_SIGNING_KEY = os.getenv('SCALR_SIGNING_KEY', 'this-is-secret-key')
SCALR_WEBHOOK = os.getenv('SCALR_WEBHOOK', 'webhook-endpoint')
MAX_AGE_SIGNATURE = 300

def validate_request(request):
   """ Validate webhook authenticity """
   if "X-Signature" not in request.headers or "Date" not in request.headers:
      logging.warning("Missing signature headers")
      return False
   if not SCALR_SIGNING_KEY:
      logging.warning("SCALR_SIGNING_KEY is not set")
      return False

   # Compute our signature
   date = request.headers["Date"]
   expected_signature = hmac.new(
      SCALR_SIGNING_KEY.encode(), request.data + date.encode(), hashlib.sha256
   ).hexdigest()
   if expected_signature != request.headers['X-Signature']:
      logging.warning('Signature does not match')
      return False
   # Check for freshness (this still allows rapid replay attack)
   date = dateutil.parser.parse(date)
   now = datetime.now(pytz.utc)
   delta = abs((now - date).total_seconds())
   if delta >= MAX_AGE_SIGNATURE:
      logging.warning("Signature is too old (%ds)" % delta)
      return False

   return True

logging.basicConfig(level=logging.DEBUG)
app = Flask(__name__)

for var in ['SCALR_SIGNING_KEY', 'SCALR_WEBHOOK']:
   logging.info('Config: %s = %s', var, globals()[var] if 'PASS' not in var else '*' * len(globals()[var]))

@app.route('/' + SCALR_WEBHOOK + '/', methods=['POST'])
def webhook_listener():
   logging.info(request)
   logging.info(request.headers)
   logging.info(request.data)
   if not validate_request(request):
      abort(403)
   out={"Status" : "ok"}
   logging.info(out)
   # your custom code that handles webhook can be here
   # This is a very simple sample of doing a POST to a 3rd party system
   #
   # import json
   # import requests
   # api_url = 'http://localhost:5000/create-row-in-gs'
   # create_row_data = {'id': '1235','name':'Joel','created_on':'27/01/2018','modified_on':'27/01/2018','desc':'This # is Joel!!'}
   # print(create_row_data)
   # r = requests.post(url=api_url, json=create_row_data)
   # print(r.status_code, r.reason, r.text)

   return jsonify(out)

if __name__ == '__main__':
   app.run(debug=False, host='0.0.0.0', port=5018)
Updated 12 months ago