Installation
The Scalr Agent can be run as a Docker service, a Kubernetes deployment, or as a containerized service on platforms like AWS Fargate or Google Cloud Run.
Before installing an agent, you must first create an Agent Pool to connect it to, and obtain an Scalr agent token by registering a new agent on the Agent Pool page.
Docker
To deploy a run agent, use the following command:
docker run \
  -v /var/run/docker.sock:/var/run/docker.sock \
  -v /var/lib/scalr-agent:/var/lib/scalr-agent \
  -e SCALR_AGENT_TOKEN={token} \
  --rm -it --pull=always --name=scalr-agent scalr/agent:latest
You need to mount SCALR_AGENT_DATA_DIR for data persistence and provide the Docker socket to enable multi-concurrency with the Docker driver.
To deploy a VCS agent, provide only the Scalr agent token:
$~ docker run \
  -e SCALR_AGENT_TOKEN={token} \
  --rm -it --pull=always --name=scalr-agent scalr/agent:latest
You can also use Docker Compose to run agents as a service.
Below is an example docker-compose.yml file for a run agent:
services:
  scalr-agent:
    image: scalr/agent:latest
    container_name: scalr-agent
    environment:
      - SCALR_AGENT_TOKEN=${SCALR_AGENT_TOKEN}
    volumes:
      - /var/run/docker.sock:/var/run/docker.sock
      - /var/lib/scalr-agent:/var/lib/scalr-agent
    pull_policy: always
    restart: unless-stopped
Place the content in the file and run the following command from the same directory:
docker compose up -dFor production deployments, pin to a fixed version tag instead of
latestand perform periodic, controlled upgrades. Before upgrading, review the changelog for breaking changes and anything requiring operator attention (these are highlighted).Scalr also flags outdated agents in the agent pool list in the UI, grouped by severity: update available, update recommended, and update required. Treat update recommended as a strong call to action.
Kubernetes
The agent can be deployed onto a Kubernetes cluster using one of the available Helm charts from https://github.com/Scalr/agent-helm.
agent-local
Deploys a static number of agents and executes runs in shared agent pods. This is the recommended default option for run agent pools and the only option for VCS agent pools.
agent-job
Deploys an agent controller and executes runs in isolated stateless jobs. Suitable for environments with strict multi-tenancy requirements.
agent-k8s
Deploys an agent controller with a set of stateful agent workers and executes runs in isolated pods. Suitable for environments with strict multi-tenancy requirements, but requires more complex configuration and a dedicated node pool.
This is an older chart that relies on a hostPath volume for shared storage between the controller and workers, and runs workloads as root by default. Consider using agent-job for new deployments.
Serverless
For serverless workloads, deploy the scalr/agent:latest image in your containerized environment as a persistent service using the SCALR_AGENT_DRIVER=local configuration option.
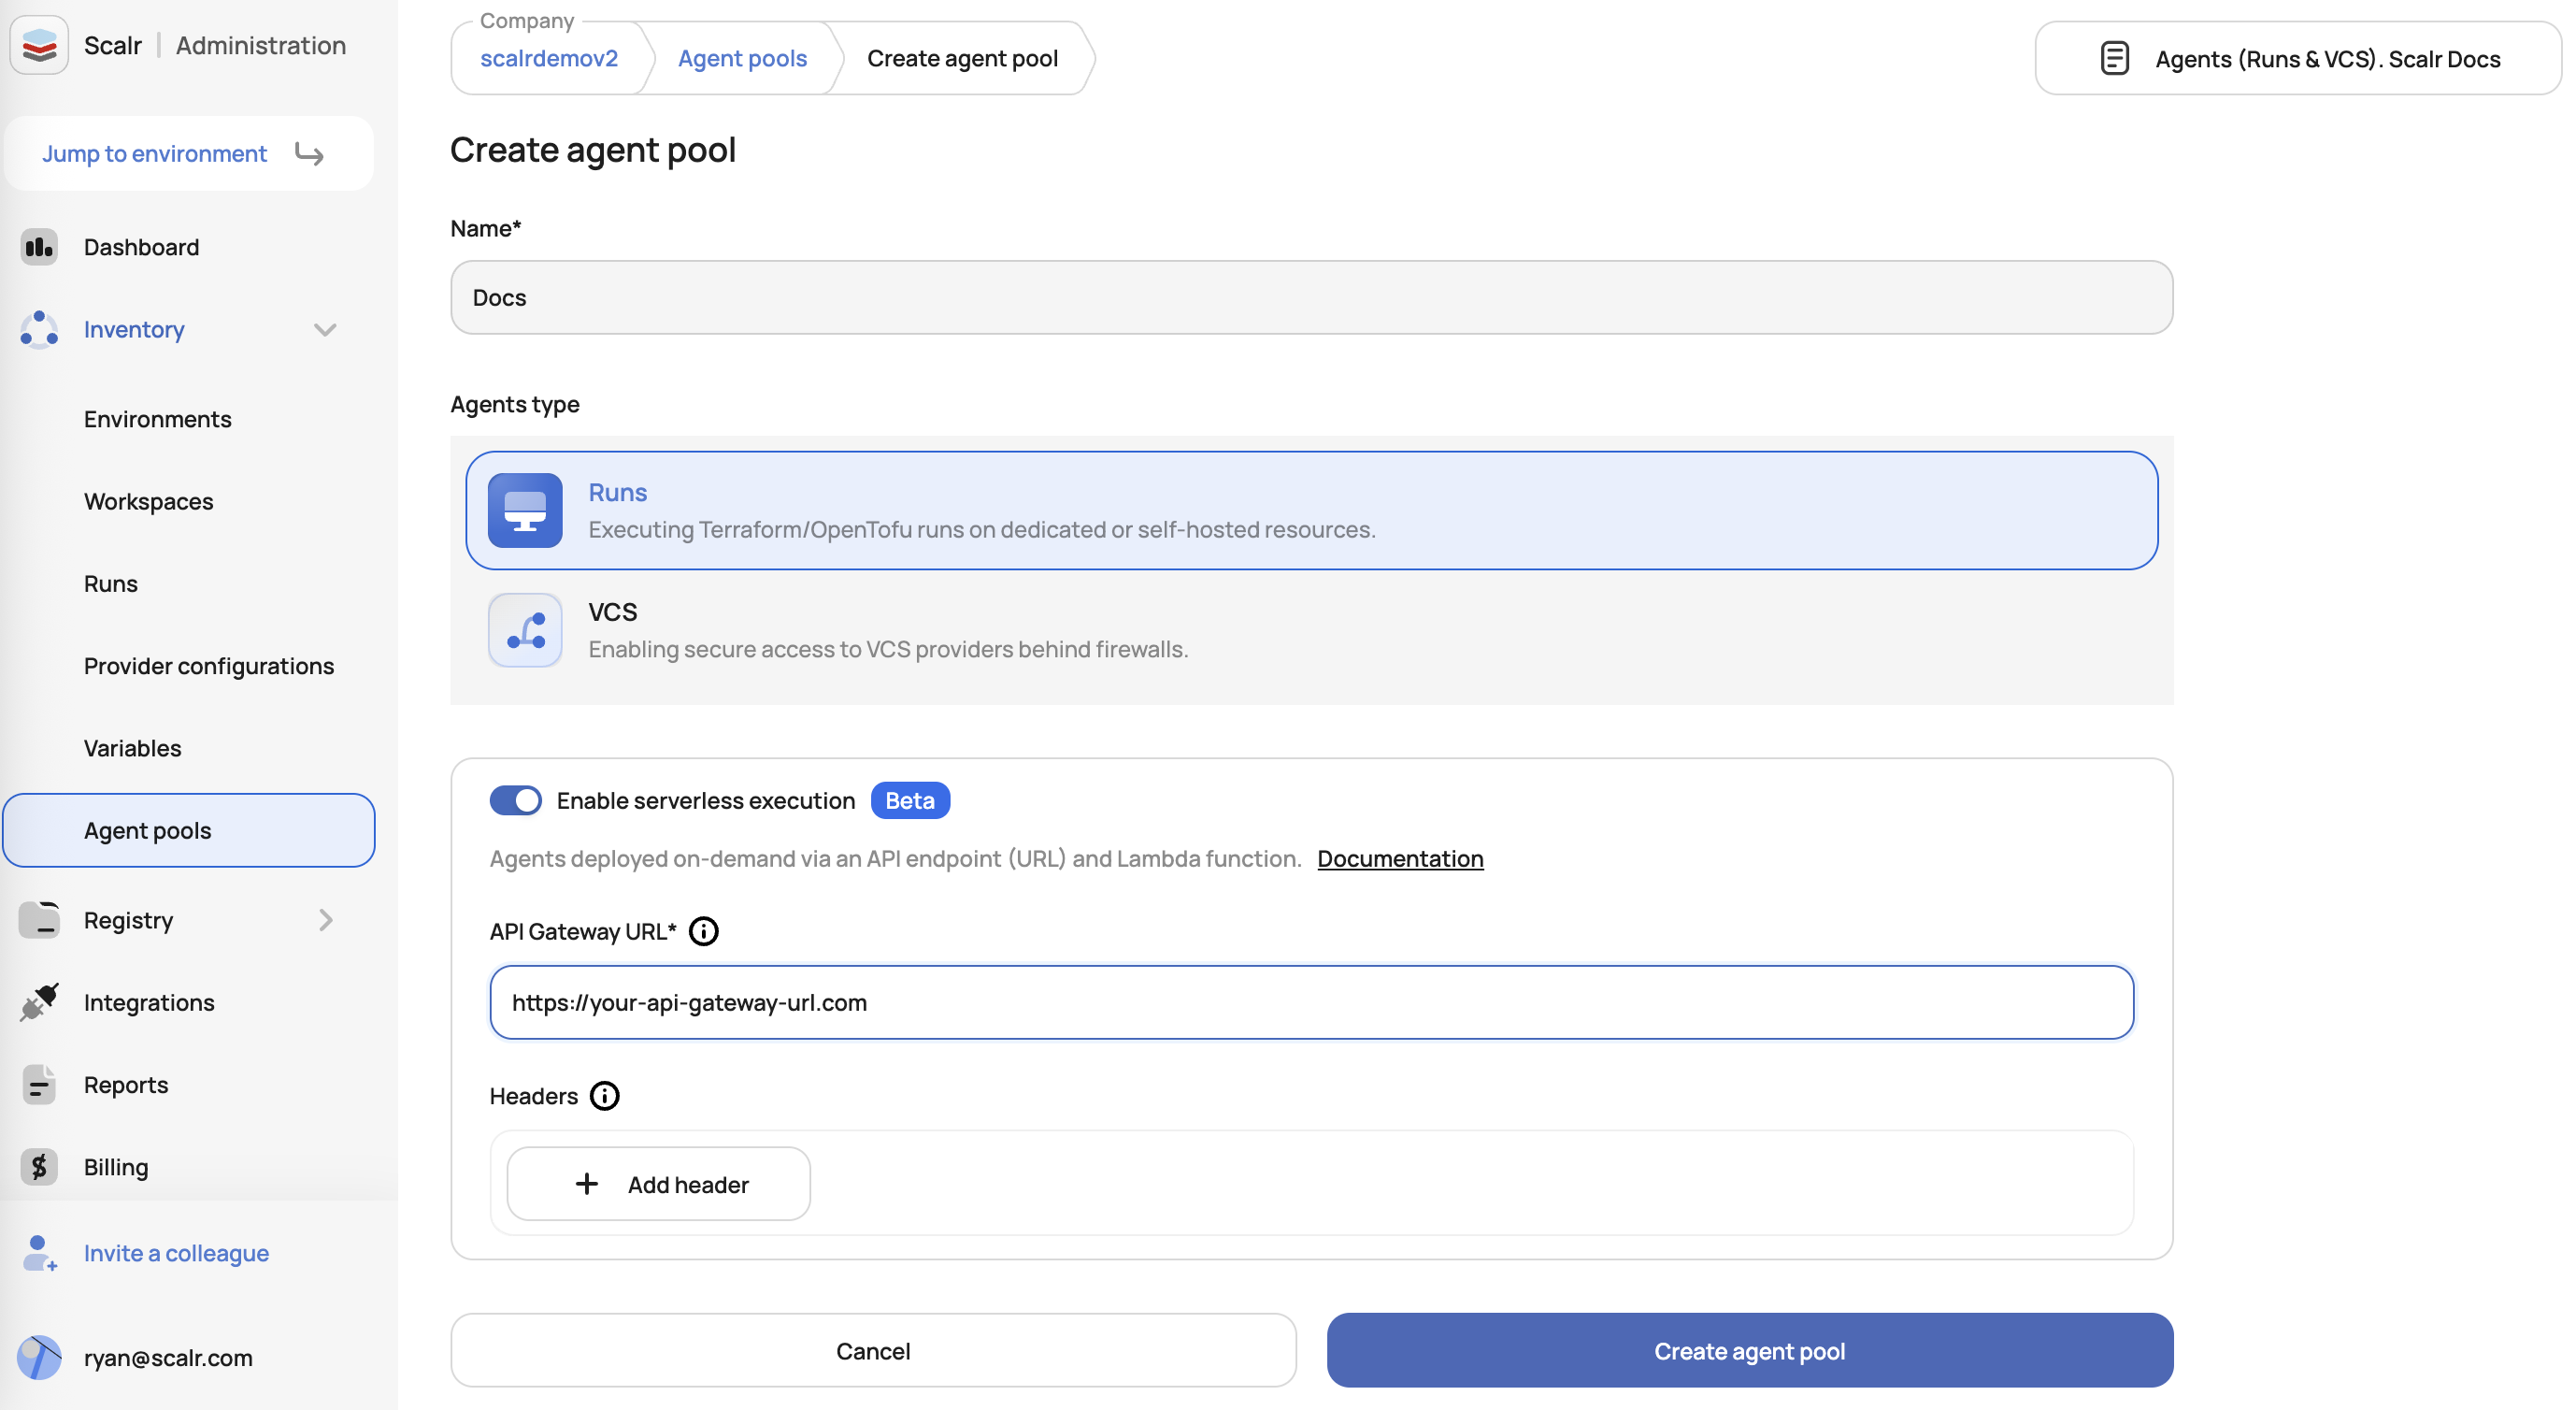
Serverless agents allow users to create agents on-demand via webhook triggers, eliminating the need for persistent compute resources. When a run is triggered, Scalr calls your API Gateway to spin up a container task (i.e. Fargate) for agent execution. Configure your agent pool with an API Gateway URL and optional custom headers, set up your serverless infrastructure (API Gateway → Lambda → Fargate), then enable serverless execution for the agent pool.
Before getting started in Scalr, create an API gateway in your cloud of choice as the URL will be needed to set up the agent in Scalr. On AWS, use an API Gateway REST API — not an HTTP API (see the note in Step 7.1 below). Once the gateway is created, go to the agent pools page in Scalr and create the agent with the URL and optional headers:
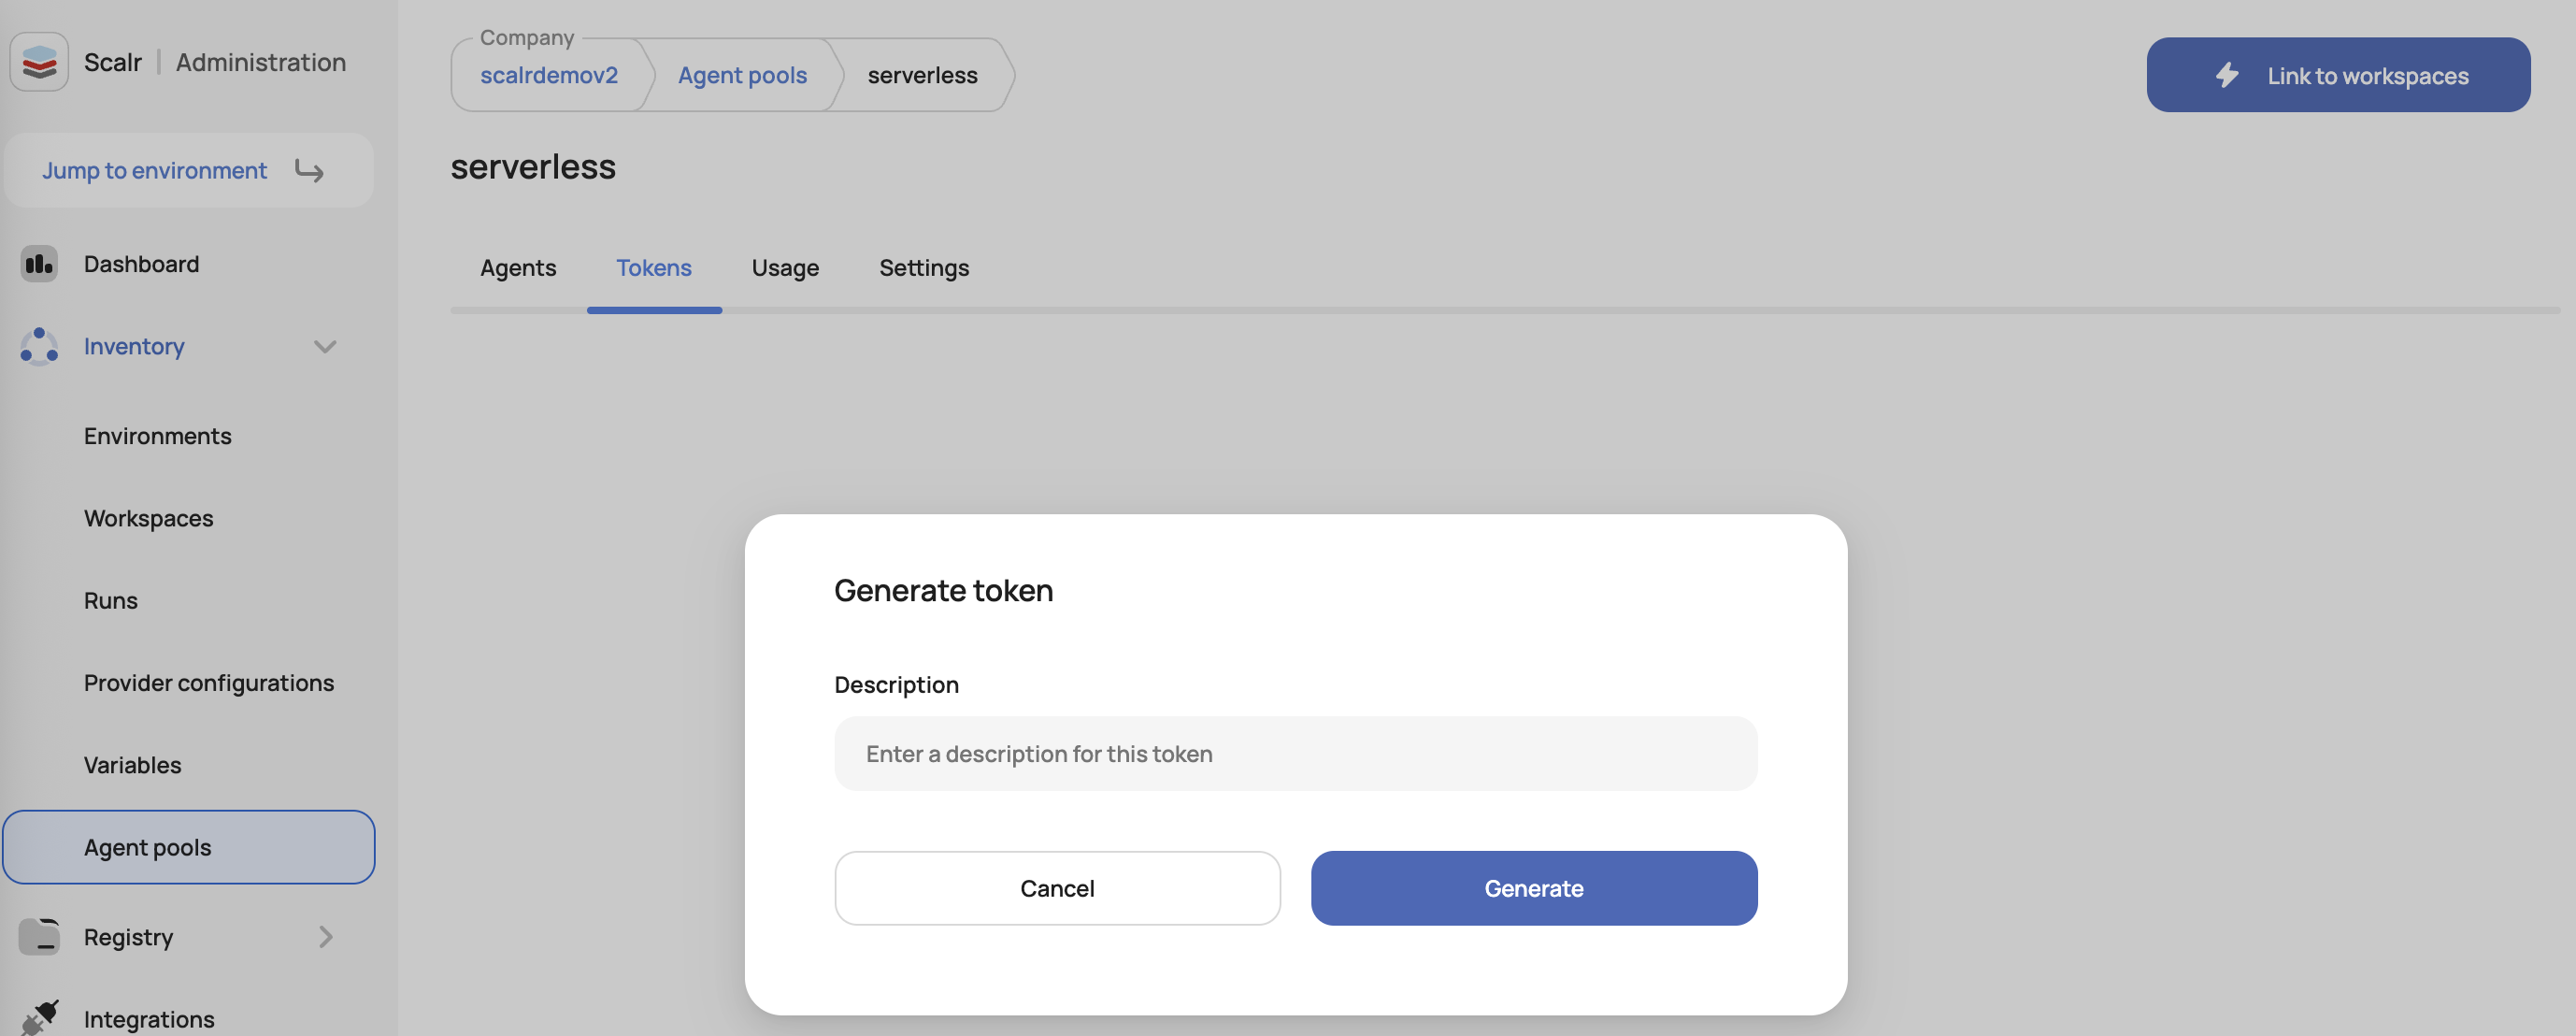
Once the pool is created, generate a token that will be used in the gateway for Scalr to authenticate to it:
The token can now be added to the gateway for authentication and the remaining components needed for the serverless agent can be set up.
The agents will only appear in Scalr when they are being used, otherwise the agents page will not show the agents.
Please see the example below that shows how to set this up in AWS with API Gateway, Lambda, and Fargate.
Configuration Guide
This guide walks through building a serverless AWS architecture that:
- Uses API Gateway as the entry point.
- Triggers an AWS Lambda function.
- Lambda starts an ECS Fargate Task.
- ECS task fetches a Scalr token from AWS Secrets Manager.
- ECS task connects to Scalr API to pull and execute a run.
This approach enables a lightweight, decoupled, secure automation flow aligned with AWS and Scalr best practices.
Architecture Flow
[API Gateway] ---> [Lambda] ---> [ECS Fargate Task] ---> [Secrets Manager] ---> [Scalr API]Prerequisites
AWS Account Requirements
-
AWS Services: Ensure the following services are available in your region:
- Amazon API Gateway
- AWS Lambda
- Amazon ECS (Elastic Container Service)
- AWS Secrets Manager
- Amazon CloudWatch (for logging)
- AWS IAM (Identity and Access Management)
-
Permissions: Your AWS user/role must have permissions to:
- Create and manage IAM roles and policies
- Create and configure ECS clusters and task definitions
- Create and manage Lambda functions
- Create API Gateway APIs
- Create and access Secrets Manager secrets
- Create CloudWatch log groups
- Manage VPC resources (if creating custom VPC)
-
Network Requirements:
- VPC with at least 2 subnets in different Availability Zones
- Internet connectivity (either public subnets or NAT Gateway for private subnets)
- Security groups configured for ECS tasks
Scalr Requirements
- Scalr Token: Valid Scalr Agent Pool token. Obtain it from Scalr console: Settings > Agent Pools > Create/View Pool
Step 1: Store Scalr Token in AWS Secrets Manager
-
Go to AWS Console > Secrets Manager
-
Click Store a new secret
-
Select Other type of secrets
-
Switch to the Plaintext tab and paste only the raw token value. Do not include the brackets, the word "token", or any quotes. Only paste in the token contents.
⚠️ Do not use the key/value editor. A key/value secret is stored as a JSON object (e.g.
{"token": "..."}), and ECS would inject that entire JSON string as theSCALR_TOKENvalue, causing the agent to fail authentication against Scalr with a 401. -
Click Next, name the secret:
- Name:
scalr/api/token
- Name:
-
Skip rotation unless needed, then click Store
-
Important: Note down the complete secret ARN from the secret details page, including the random suffix at the end. It will look like:
arn:aws:secretsmanager:<region>:<account-id>:secret:scalr/api/token-AbCdEf
Step 2: Create IAM Roles and Policies
Note: Now that you have created the secret, you can use its exact ARN in the policy documents below.
2.1: Create ECS Task Role
This role allows the ECS task to access AWS Secrets Manager to retrieve the Scalr token.
Create ECS Task Policy
-
Go to IAM > Policies > Create policy
-
Switch to JSON mode and enter the following policy. ⚠️ Replace the Resource ARN with your actual secret ARN from Step 1 (the trailing
*is intentional here — IAM needs it to match the random suffix on the secret ARN):{ "Version": "2012-10-17", "Statement": [ { "Effect": "Allow", "Action": "secretsmanager:GetSecretValue", "Resource": "arn:aws:secretsmanager:<region>:<account-id>:secret:scalr/api/token*" } ] } -
Click Next, enter policy name: ScalrECSTaskPolicy
-
Click Create policy
Create ECS Task Role
- Go to IAM > Roles > Create role
- Select Trusted entity type: AWS service
- Select Use case: Elastic Container Service > Elastic Container Service Task
- Click Next
- Search and select the policy created above: ScalrECSTaskPolicy
- Click Next, enter role name: ScalrECSTaskRole
- Click Create role
2.2: Create ECS Task Execution Role
This role allows ECS to pull container images, write logs to CloudWatch, and access secrets.
Create ECS Task Execution Policy
-
Go to IAM > Policies > Create policy
-
Switch to JSON mode and enter the following policy. ⚠️ Replace the secret ARN with your actual secret ARN from Step 1:
{ "Version": "2012-10-17", "Statement": [ { "Effect": "Allow", "Action": [ "ecr:GetAuthorizationToken", "ecr:BatchCheckLayerAvailability", "ecr:GetDownloadUrlForLayer", "ecr:BatchGetImage", "logs:CreateLogStream", "logs:PutLogEvents" ], "Resource": "*" }, { "Effect": "Allow", "Action": "secretsmanager:GetSecretValue", "Resource": "arn:aws:secretsmanager:<region>:<account-id>:secret:scalr/api/token*" } ] } -
Click Next, enter policy name: ScalrECSExecutionPolicy
-
Click Create policy
Create ECS Task Execution Role
- Go to IAM > Roles > Create role
- Select Trusted entity type: AWS service
- Select Use case: Elastic Container Service > Elastic Container Service Task
- Click Next
- Search and select the policy created above: ScalrECSExecutionPolicy
- Click Next, enter role name: ScalrECSExecutionRole
- Click Create role
Step 3: Create CloudWatch Log Group
Before creating the ECS cluster, create a CloudWatch log group for the ECS tasks:
- Go to CloudWatch > Log groups
- Click Create log group
- Enter log group name:
/ecs/scalr-agent-pool-cluster - Set retention period as needed (e.g., 7 days)
- Click Create
Step 4: Create ECS Fargate Objects
4.1: Create ECS Cluster
- Go to ECS > Clusters
- Click Create cluster
- Enter cluster name: ScalrServerless
- Infrastructure: AWS Fargate (serverless)
- Click Create
4.2: Create Task Definition
- Go to ECS > Task Definitions > Create new task definition
- Choose Create new task definition with JSON
- Replace the default JSON with the following configuration. ⚠️ Replace placeholders with your actual values. For
valueFrom, use the complete secret ARN from Step 1, including the random suffix (e.g....token-AbCdEf) — do not use a*wildcard here; wildcards are only valid in IAM policies, not in task definitions:
{
    "family": "scalr-agent-run",
    "taskRoleArn": "arn:aws:iam::<account-id>:role/ScalrECSTaskRole",
    "executionRoleArn": "arn:aws:iam::<account-id>:role/ScalrECSExecutionRole",
    "networkMode": "awsvpc",
    "requiresCompatibilities": ["FARGATE"],
    "cpu": "2048",
    "memory": "4096",
    "containerDefinitions": [
        {
            "name": "scalr-agent-run",
            "image": "scalr/agent:latest",
            "essential": true,
            "environment": [
                {
                    "name": "SCALR_AGENT_SINGLE",
                    "value": "true"
                },
                {
                    "name": "SCALR_AGENT_DRIVER",
                    "value": "local"
                }
            ],
            "secrets": [
                {
                    "name": "SCALR_AGENT_TOKEN",
                    "valueFrom": "arn:aws:secretsmanager:<region>:<account-id>:secret:scalr/api/token-AbCdEf"
                }
            ],
            "logConfiguration": {
                "logDriver": "awslogs",
                "options": {
                    "awslogs-group": "/ecs/scalr-agent-pool-cluster",
                    "awslogs-region": "<region>",
                    "awslogs-stream-prefix": "ecs"
                }
            },
            "stopTimeout": 120
        }
    ]
}- Click Create to save the task definition
Step 5: Configure Networking
5.1: Create or Identify VPC Resources
You'll need the following networking components for ECS Fargate tasks:
Option A: Use Default VPC (Simplest)
- Go to VPC Console
- Note down your default VPC ID
- Note down at least 2 subnet IDs from different availability zones
- Note down the default security group ID
Option B: Create Custom VPC (Recommended for Production)
- Go to VPC > Create VPC
- Choose VPC and more for guided setup
- Configure:
- Name:
scalr-serverless-vpc - IPv4 CIDR:
10.0.0.0/16 - Availability Zones: 2
- Public subnets: 2
- Private subnets: 2 (if you want NAT Gateway)
- NAT gateways: 1 (optional, for private subnets)
- Name:
- Click Create VPC
5.2: Create Security Group
- Go to EC2 > Security Groups > Create security group
- Configure:
- Name:
scalr-ecs-sg - Description:
Security group for Scalr ECS tasks - VPC: Select your VPC
- Name:
- Outbound rules: Keep default (All traffic to 0.0.0.0/0)
- Inbound rules: No inbound rules needed for this use case
- Click Create security group
- Note down the security group ID
Step 6: Create Lambda Function and Role
6.1: Create Lambda Execution Role
This role allows Lambda to trigger ECS tasks and pass the required ECS roles.
Create Lambda Execution Policy
-
Go to IAM > Policies > Create policy
-
Switch to JSON mode and enter the following policy. ⚠️ Replace
<region>and<account-id>with your actual values:{ "Version": "2012-10-17", "Statement": [ { "Effect": "Allow", "Action": [ "logs:CreateLogGroup", "logs:CreateLogStream", "logs:PutLogEvents" ], "Resource": "arn:aws:logs:<region>:<account-id>:*" }, { "Effect": "Allow", "Action": "ecs:RunTask", "Resource": "arn:aws:ecs:<region>:<account-id>:task-definition/scalr-agent-run:*" }, { "Effect": "Allow", "Action": "iam:PassRole", "Resource": [ "arn:aws:iam::<account-id>:role/ScalrECSTaskRole", "arn:aws:iam::<account-id>:role/ScalrECSExecutionRole" ] }, { "Effect": "Allow", "Action": [ "ec2:CreateNetworkInterface", "ec2:DescribeNetworkInterfaces", "ec2:DeleteNetworkInterface" ], "Resource": "*" } ] } -
Click Next, enter policy name: ScalrLambdaExecutionPolicy
-
Click Create policy
Create Lambda Execution Role
- Go to IAM > Roles > Create role
- Select Trusted entity type: AWS service
- Select Use case: Lambda
- Click Next
- Search and select the policy created above: ScalrLambdaExecutionPolicy
- Click Next, enter role name: ScalrLambdaExecutionRole
- Click Create role
6.2: Create Lambda Function
- Go to AWS Lambda > Create Function
- Choose Author from scratch
- Enter function name: ScalrServerless
- Runtime: Python 3.13
- Under Change default execution role, select Use an existing role
- Choose the role created above: ScalrLambdaExecutionRole
- Click Create function
Configure Lambda Function Code
-
In the Lambda function console, scroll down to Code source
-
Replace the default code with the following. ⚠️ Replace the subnet and security group IDs with the values from Step 5:
import boto3
import json
import logging

# Configure logging
logger = logging.getLogger()
logger.setLevel(logging.INFO)

def lambda_handler(event, context):
  """
  Lambda function to trigger ECS Fargate task for Scalr agent execution
  """
  ecs_client = boto3.client('ecs')

  try:
      # Configure ECS task parameters
      cluster_name = 'ScalrServerless'
      task_definition = 'scalr-agent-run'

      # Network configuration - use values from Step 5
      subnet_ids = ['subnet-xxxxxx']  # Replace with subnet IDs from Step 5
      security_group_ids = ['sg-xxxxxx']  # Replace with security group ID from Step 5

      # Run the ECS task
      response = ecs_client.run_task(
          cluster=cluster_name,
          launchType='FARGATE',
          taskDefinition=task_definition,
          networkConfiguration={
              'awsvpcConfiguration': {
                  'subnets': subnet_ids,
                  'securityGroups': security_group_ids,
                  'assignPublicIp': 'ENABLED'  # Set to DISABLED if using NAT Gateway
              }
          }
      )

      task_arn = response['tasks'][0]['taskArn']
      logger.info(f"ECS Task started successfully: {task_arn}")

      return {
          "statusCode": 200,
          "body": json.dumps({
              "message": "ECS Task triggered successfully",
              "taskArn": task_arn
          })
      }

  except Exception as e:
      logger.error(f"Error triggering ECS task: {str(e)}")
      return {
          "statusCode": 500,
          "body": json.dumps({
              "error": "Failed to trigger ECS task",
              "details": str(e)
          })
}- Click Deploy to save the function
Step 7: Create API Gateway
7.1: Create REST API
-
Go to API Gateway > Create API
-
Choose REST API and click Build
⚠️ Do not choose "HTTP API", even though the AWS console promotes it as the default option. HTTP APIs (API Gateway v2) do not support resource policies (used to restrict access to Scalr IP addresses) or API keys and usage plans, so the authentication configured in the following steps will not work.
-
Configure:
- API name:
scalr-serverless-api - Description:
REST API to trigger Scalr serverless tasks - Endpoint Type: Regional
- API name:
-
Click Create API
7.2: Create Resource and Method
- In the API Gateway console, select your API
- Click Actions > Create Resource
- Configure:
- Resource Name:
trigger - Resource Path:
/trigger
- Resource Name:
- Click Create Resource
- With
/triggerselected, click Actions > Create Method - Select POST from dropdown and click the checkmark
- Configure integration:
- Integration type: Lambda Function
- Use Lambda Proxy integration: ✓ (checked)
- Lambda Function:
ScalrServerless
- Click Save and OK to grant permissions
7.3: Configure API Key Authentication
- With the POST method selected under
/trigger - Click Method Request
- Set API Key Required:
true - Click the checkmark to save
7.4: Create API Key and Usage Plan
-
In the left sidebar, click API Keys
-
Click Actions > Create API Key
-
Configure:
- Name:
scalr-webhook-key - Description:
API key for Scalr webhook authentication
- Name:
-
Click Save
-
Copy the API Key value (you'll need this for Scalr configuration)
-
In the left sidebar, click Usage Plans
-
Click Create
-
Configure:
- Name:
scalr-webhook-plan - Throttling: 1000 requests per second, 2000 burst
- Quota: 10000 requests per day
- Name:
-
Click Next
-
Click Add API Stage
-
Select your API and stage, click the checkmark
-
Click Next
-
Click Add API Key to Usage Plan
-
Select your API key, click the checkmark
-
Click Done
7.5: Deploy API
- Click Actions > Deploy API
- Deployment stage: Create new stage
- Stage name:
prod - Click Deploy
- Copy the Invoke URL (you'll need this for Scalr configuration)
Step 8: Test the API
- Note down the Invoke URL from the API Gateway console
- Test using curl with the API key:
curl -X POST https://your-api-id.execute-api.region.amazonaws.com/prod/trigger \
  -H "Content-Type: application/json" \
  -H "x-api-key: YOUR_API_KEY_HERE" \
-d '{}'Important: Always include the x-api-key header with your API key value.
The API should return a success response and trigger the ECS task.
Security Best Practices
| Component | Practice |
|---|---|
| API Gateway | Use a REST API; require API keys for authentication, implement throttling and quotas |
| Secrets Manager | Store the token as a plaintext secret (not key-value), rotate if needed |
| IAM | Least privilege: Lambda can only run tasks; ECS task can only read token |
| Container Security | Do not store secrets in image; fetch at runtime |
| Logging | Enable CloudWatch logs for ECS, Lambda |
Example Use Case
Scalr webhook → API Gateway → Lambda → ECS → token fetch → Scalr API
This flow supports automation like:
- Remote plan/apply runners
- Remote policy checks
- CI/CD integrations
Troubleshooting
Common Issues and Solutions
1. Lambda Function Issues
Error: "Task failed to start"
- Cause: Incorrect subnet IDs or security group IDs in Lambda code
- Solution: Verify subnet and security group IDs in Lambda function code
- Check: Ensure subnets are in the same VPC and have internet access
Error: "Access Denied" when running ECS task
- Cause: Lambda execution role missing permissions
- Solution: Verify
ScalrLambdaExecutionPolicyincludesecs:RunTaskandiam:PassRolepermissions - Check: Ensure task definition ARN matches the policy resource
2. ECS Task Issues
Error: "Task stopped with exit code 1"
- Cause: Container cannot access Secrets Manager or Scalr API
- Solution: Check CloudWatch logs at
/ecs/scalr-agent-pool-cluster - Verify:
- ECS task role has
secretsmanager:GetSecretValuepermission - Secret ARN format is correct in task definition
- Container has internet access
- ECS task role has
Error: "CannotPullContainerError"
- Cause: ECS cannot pull the container image
- Solution: Verify ECS execution role has ECR permissions
- Check: Ensure
ScalrECSExecutionPolicyincludes ECR permissions
3. Networking Issues
Error: "Task failed to start" with networking errors
- Cause: Subnet or security group configuration issues
- Solution:
- Verify subnets have internet access (public IP or NAT Gateway)
- Check security group allows outbound traffic to internet
- Ensure subnets are in different AZs
4. Secrets Manager Issues
Error: "Secrets Manager secret not found"
-
Cause: Incorrect secret ARN in the task definition — most commonly a
*wildcard copied from the IAM policy, or a missing random suffix -
Solution: Use the complete secret ARN from the secret details page in the task definition's
valueFrom:arn:aws:secretsmanager:<region>:<account-id>:secret:scalr/api/token-AbCdEf
Agent fails to connect with Status 401: Unauthorized, or SCALR_TOKEN contains JSON like {"token":"..."}
- Cause: The secret was stored as a key-value pair instead of plaintext. ECS injects the entire JSON object as the environment variable value, so the agent presents
{"token":"..."}to Scalr instead of the token itself — even though the token inside the secret is correct. - Solution: Re-create the secret using the Plaintext tab with only the raw token value (see Step 1). Alternatively, keep the key-value secret and append the JSON key to the
valueFromARN:arn:aws:secretsmanager:<region>:<account-id>:secret:scalr/api/token-AbCdEf:token::(the full ARN with the random suffix is required when referencing a JSON key).
5. API Gateway Issues
Error: "Forbidden" or "Missing Authentication Token"
- Cause: Missing or invalid API key, or the API was created as an HTTP API instead of a REST API
- Solution: Ensure you're including the
x-api-keyheader with a valid API key, and confirm the API type is REST (see Step 7.1) - Check: Verify API key is associated with the usage plan and stage
Error: "Internal Server Error" from API
- Cause: Lambda function error
- Solution: Check Lambda function logs in CloudWatch
- Verify: Lambda function has correct permissions and configuration
Debugging Steps
-
Check CloudWatch Logs:
- Lambda logs:
/aws/lambda/ScalrServerless - ECS logs:
/ecs/scalr-agent-pool-cluster
- Lambda logs:
-
Verify IAM Permissions:
- Use AWS CLI to test permissions:
aws sts get-caller-identity - Check role trust relationships and policies
- Use AWS CLI to test permissions:
-
Test Components Individually:
- Test Lambda function directly from AWS Console
- Manually run ECS task from ECS Console
- Verify secret access from ECS task
-
Monitor ECS Task Status:
- Go to ECS Console > Clusters > ScalrServerless > Tasks
- Check task status and details for error messages
Next Steps
Enhancements
- Error Handling: Add retry logic to Lambda in case of ECS launch failures
- Monitoring: Set up CloudWatch alarms for task failures
- Logging: Configure structured logging for better debugging
- Security: Implement API Gateway authentication (API keys, JWT, etc.)
- Scaling: Configure auto-scaling for ECS tasks if needed
Monitoring and Observability
- CloudWatch Dashboards: Create dashboards to monitor API calls, Lambda executions, and ECS task status
- AWS X-Ray: Enable tracing for end-to-end request tracking
- EventBridge: Use AWS EventBridge to capture ECS task state changes for automated workflows
Infrastructure as Code
- Terraform: Use the included Terraform modules for automated deployment
- CDK/CloudFormation: Convert to Infrastructure as Code for version control and repeatability
Resource Summary
After completing this guide, you will have created:
| Resource Type | Name | Purpose |
|---|---|---|
| IAM Policy | ScalrECSTaskPolicy | Allows ECS task to access Secrets Manager |
| IAM Role | ScalrECSTaskRole | Task role for ECS container |
| IAM Policy | ScalrECSExecutionPolicy | Allows ECS to pull images and write logs |
| IAM Role | ScalrECSExecutionRole | Execution role for ECS service |
| IAM Policy | ScalrLambdaExecutionPolicy | Allows Lambda to trigger ECS tasks |
| IAM Role | ScalrLambdaExecutionRole | Execution role for Lambda function |
| CloudWatch Log Group | /ecs/scalr-agent-pool-cluster | Stores ECS task logs |
| ECS Cluster | ScalrServerless | Fargate cluster for running tasks |
| ECS Task Definition | scalr-agent-run | Defines the Scalr agent container |
| Lambda Function | ScalrServerless | Triggers ECS tasks via API calls |
| API Gateway | scalr-serverless-api | REST API endpoint (not HTTP API) |
| Secrets Manager Secret | scalr/api/token | Stores Scalr agent token (plaintext) |
For Infrastructure as Code deployment using Terraform, see the included modules in this repository.
Linux Packages Deprecation
The DEB and RPM Linux packages are planned for deprecation after March 31th, 2026.
After that date, Linux packages will still be available but will not receive any updates.
If you have any concerns, questions, or need help with the upgrade, please raise an issue via Scalr Support Center.
Upgrade Guide
To prepare for this change, please begin transitioning your agents to our recommended Docker or Kubernetes deployment methods. We recommend using Docker Compose to run agents as a service as the easiest drop-in replacement for Linux packages. This allows you to reconfigure the existing Scalr Agent on your instance to run under the system Docker daemon instead of the embedded one as part of the regular upgrade process.
Remove the existing Linux package
For Debian/Ubuntu (DEB):
sudo systemctl stop scalr-agent
sudo apt-get remove scalr-agent
For RHEL/CentOS/Fedora (RPM):
sudo systemctl stop scalr-agent
sudo yum remove scalr-agent
# or for newer systems
sudo dnf remove scalr-agent
Install Docker and Docker Compose
Follow the official Docker installation instructions for your platform: https://docs.docker.com/engine/install/
If you want to manage Docker as a non-root user, follow these post-installation steps: https://docs.docker.com/engine/install/linux-postinstall/#manage-docker-as-a-non-root-user
Create Docker Compose configuration
Create a docker-compose.yml file in a directory of your choice. In this example, we'll use /opt/scalr-agent:
services:
  scalr-agent:
    image: scalr/agent:latest
    container_name: scalr-agent
    restart: unless-stopped
    env_file:
      - /etc/scalr-agent/agent.conf
    volumes:
      - /var/lib/scalr-agent:/var/lib/scalr-agent
      - /var/run/docker.sock:/var/run/docker.sock
    pull_policy: always
    restart: unless-stopped
The SCALR_AGENT_TOKEN (or SCALR_TOKEN) is expected to be present in the existing /etc/scalr-agent/agent.conf configuration file. If it missing, add it to your Docker Compose configuration:
...
services:
  scalr-agent:
    image: scalr/agent:latest
    container_name: scalr-agent
    restart: unless-stopped
    environment:
      - SCALR_AGENT_TOKEN=<your-token-here>
    ...
Start the agent
cd /opt/scalr-agent/
docker compose up -d
Verify the agent is running
Check the agent logs:
docker logs scalr-agentVerify the agent is connected to your pool in the Scalr UI.
Check the container status:
docker ps | grep scalr-agentEnable automatic startup
The restart: unless-stopped policy in the Docker Compose file ensures the agent starts automatically on system boot. To verify Docker starts on boot:
sudo systemctl enable dockerUpdated 10 days ago